![[iOS] Push Notification(2). PushNotification 구현](https://img1.daumcdn.net/thumb/R750x0/?scode=mtistory2&fname=https%3A%2F%2Fblog.kakaocdn.net%2Fdna%2Ft4B5s%2Fbtsxh60TrbV%2FAAAAAAAAAAAAAAAAAAAAAF1iRPP6wruzgD0qB6O_8h805Ncp1qlNUkASd4tygltE%2Fimg.png%3Fcredential%3DyqXZFxpELC7KVnFOS48ylbz2pIh7yKj8%26expires%3D1764514799%26allow_ip%3D%26allow_referer%3D%26signature%3Dv13Ac9CoII8EboN2oStfWzxGyHE%253D)
출처: Kodeco
PushNotification
Push Notification에 필요한 배경지식은 여기에 정리되어있습니다.
PushNotification은 흔히 푸시알림, 푸시 메시지로 일컫는 형태입니다.

앱에서 알림을 보내야 하는 경우가 필요합니다.
새로운 메세지가 왔던가,
새로운 소식을를 전달하던가
Push를 진행하기 위해선 Push Server가 필요하지만..
여기에선 terminal을 통한 push TEST를 진행해봅니다.
사전 작업
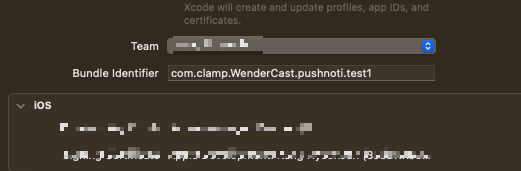
1. Bundle Identifier
PushNotification을 사용하기 위해선 Apple Developer계정이 있어야 합니다.
Bundle Identifier를 설정해줍니다.
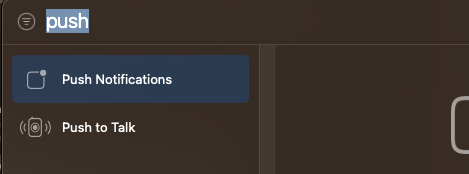
2. Push Notification 사용 설정
해당 Target에 Signing&Capabilities에 들어가서 cmd+shift+L(+버튼)을 클릭해 Push를 추가해줍니다.
3. Apple Deveoper Center에서 확인
여기에 접속해 설정한 Identifier를 찾아갑니다.
이후 PushNotification이 켜져있는지 확인합니다.

4. 시뮬레이터로 테스트에 사용할 APNS파일을 준비합니다.
해당 프로젝트로에 텍스트 에디터로 아무 파일을 추가해줍니다.
다음 해당 파일을 우클릭해 정보가져오기 -> 이름 및 확장자를 "first.apns" 로 설정합니다.
다음 파일을 열면 XCode에서 오픈됩니다.
아래 JSON 형식을 입력하고 저장합니다.
{
  "aps": {
    "alert": "Breaking News!",
    "sound": "default",
    "link_url": "https://raywenderlich.com",
    "category": "NEWS_CATEGORY"
  }
}
5. 시뮬레이터로 푸시를 보낼 준비를 합니다.
XCode -> Window -> Devices and Simulators 로 이동해서
테스트 할 시뮬레이터를 선택해 identifier를 복사해 놓습니다.
Bundle Identifier또한 복사해줍니다.
터미널에서 first.apns가 있는 폴더로 이동합니다.
명령어를 준비합니다.
xcrun simctl push [Simulator Identifier] [BundleIdentifier] first.apns
아래의 권한 설정과 APNs등록을 마치면 테스트 할 수 있습니다.
권한 설정과 Push를 보내고 처리하는 과정.
1. Push Notification의 권한 요청
Notification을 사용하기 위해선 권한이 필요합니다.
사용자에게 권한을 요청해야합니다.
// AppDelegate

func registerForPushNotifications() {

	// 알림을 표시하기 위한 권한을 요청 option: 알림 유형
    let options: UNAuthorizationOptions = [.alert, .sound, .badge]

    UNUserNotificationCenter.current()
      .requestAuthorization( // 요청을 진행하게됨
        options: options,
        completionHandler: { granted, error in // 권한을 승인받았다면 granted에는 true가 도착하게 됩니다.

          guard granted else { return }

          self.getNotificationSettings() // 2.에서 설명
        })
  }
UNUserNotificationCenter는 푸시 알림을 포함하여 모든 알림 관련 활동을 처리합니다.
이 메서드를 didFinishLaunchingWithOptionsd에서 실행해줍니다.
2. 권한이 부여됐다면 APNs에 디바이스 토큰을 발급을 요청합니다.
// APNs에 디바이스토큰을 요청
  func getNotificationSettings() {
    UNUserNotificationCenter.current().getNotificationSettings { settings in

      print("Notification settings: \(settings)")

      guard settings.authorizationStatus == .authorized else { return }

      DispatchQueue.main.async {
        // APNs에 등록을 시작(메인스레드에서 해야함)
        UIApplication.shared.registerForRemoteNotifications()
      }
    }
  }
UNNotificationCenter에서 Setting을 가져옵니다. 권한이 부여됐다면 APNs에 등록을 시작합니다.
이는 메인스레드에서 진행해야하며, 그렇지 않으면 에러가 발생합니다.

3. 디바이스 토큰 획득
디바이스 토큰이 정상적으로 APNs에서 발급, 등록이 되었다면 AppDelegate에 메서드로 완료여부가 도착합니다.
실패와 성공 여부에 따라서 실행되는 메서드가 다른데 아래와 같습니다.
성공시
func application(_ :, didRegisterForRemoteNotificationsWithDeviceToken deviceToken: Data)
해당 메서드로 도착한 DeviceToken을 출력해보면 아래와 같습니다.


실패시
func application(_ application: UIApplication, didFailToRegisterForRemoteNotificationsWithError error: Error)
이후 상황에 따라 다른 메서드가 불리게 됩니다.
성공했다면 Push를 보내 테스트를 시작할 수 있습니다.
xcrun simctl push [Simulator Identifier] [BundleIdentifier] first.apns
1. 앱이 종료된 상태에 Push를 터치해 앱이 켜지는 경우
AppDelegate의 didFinishLaunchingWithOptions을 통해 launchOption에 알람이 전달됩니다.
  func application(_ application: UIApplication,
      didFinishLaunchingWithOptions launchOptions: [UIApplication.LaunchOptionsKey: Any]?
  ) -> Bool {

    registerForPushNotifications()

    let notificationOption = launchOptions?[.remoteNotification]

    if let notification = notificationOption as? [String: AnyObject],
       let aps = notification["aps"] as? [String: AnyObject] {
       // 가져온 데이터를 활용해 화면을 전환하고 데이터를 업데이트하는등의 작업을 수행합니다.
      NewsItem.makeNewsItem(aps)
      (window?.rootViewController as? UITabBarController)?.selectedIndex = 1
    }
2. 앱이 실행중이고 Foreground상태(종료되지 않은경우)일때 Push가 도착해 탭한경우
func application(_ : , didReceiveRemoteNotification: , fetchCompletionHandler: )
여기서도 마찬가지로 가져온 다이터를 활용해 다양한 작업을 수행할 수 있습니다.
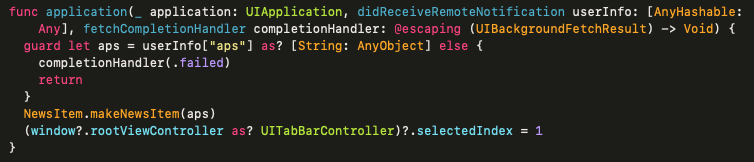
앱이 종료된경우 이 메서드는 호출되지 않습니다.
이 메서드는 push로 전달된 데이터를 처리합니다.
3. 기타 설정을 해주지 않으면 App이 Foreground상태일경우 alert, badge, sound등을 표시하지 않습니다.
이를위해 delegate를 채택하고, 표시할 요소들을 handler에게 넘겨줍니다.
extension AppDelegate: UNUserNotificationCenterDelegate {
  func userNotificationCenter(_ center: UNUserNotificationCenter, willPresent notification: UNNotification, withCompletionHandler completionHandler: @escaping (UNNotificationPresentationOptions) -> Void) {

    // 푸시가 오면 alert, badge, sound를 표시하라는 의미
    completionHandler([.alert, .badge, .sound])
  }
}
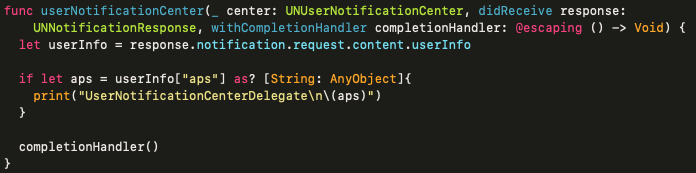
4. push를 탭한 경우 앱이 종료되어있지 않은 상태라면 UNUserNotificationCenterDelegate의 메서드로도 push가 도착합니다.
userNotificationCenter(_:didReceive:withCompletionHandler:)
이 메서드는 2번에서 설명한 func application(_ : , didReceiveRemoteNotification: , fetchCompletionHandler: )과 비슷하지만 다른점이 있습니다.
userNotificationCenter(_:didReceive:withCompletionHandler:)는 사용자가 푸시를 탭하면 호출이 되는데, didReceive와는 다르게 알림의 액션 버튼에 대한 처리를 할 수 있습니다. 자세한 내용은 아래에서 설명합니다.
카카오톡,메일 앱, 트위터앱을 예로 들면 알람이 왔을 때
채팅방에 접속을 하지 않고 답장을 보내는 기능이라던가,
알람 자체에서 "답글기능", "즐겨찾기"기능이 있는걸 확인할 수 있습니다.
이런 기능을 Working With Actionable Notifications라고 합니다.
카테고리와 액션을 사용해 가능합니다.

유저에게 허가를 받고

우선 Action들을 정의합니다.
그리고, 카테고리를 생성해 해당 카테고리에서 제공할 액션들을 추가해줍니다.
예를 들어 이 코드에는 News_Category 에서는 "보기"라는 액션을 제공합니다.
여러개가 될 수도 있겠죠
아래처럼 NotificationCenter에 Category를 등록해주면 사용할 수 있습니다.
그리고, APNs에 Data를 전송할 때 category를 정의하면서 설정해준 Identifier를 함께 전달합니다.
예를 들어 위에서 설정한 카테고리의 identifier는 "NEWS_CAGEGORY"입니다.
이렇게요.

notification이 트리거되면 UNUserNotificationCenter에 Delegate를 전달합니다.
AppDelegate에서 UNUserNotificationCenterDelegate를 채택하고 Delegate 메서드를 구현합니다.
extension AppDelegate: UNUserNotificationCenterDelegate {
  func userNotificationCenter(_ center: UNUserNotificationCenter, didReceive response: UNNotificationResponse, withCompletionHandler completionHandler: @escaping () -> Void) {
    let userInfo = response.notification.request.content.userInfo

    if let aps = userInfo["aps"] as? [String: AnyObject],
       let newsItem = NewsItem.makeNewsItem(aps) {
      (window?.rootViewController as? UITabBarController)?.selectedIndex = 1

      if response.actionIdentifier == Identifiers.viewAction,
         let url = URL(string: newsItem.link) {
        let safari = SFSafariViewController(url: url)
        window?.rootViewController?.present(safari, animated: true)
      }
    }

    completionHandler()
  }

}
여기선 "보기"를 탭하면 noti로 들어온 link를 safari로 띄우는 작업입니다.
이외에 다양한 기능을 커스텀할 수 있습니다.